
Just this morning, my Laptop external hard drive, filled with years of personal files, suddenly became unreadable. Every time I connected it, Windows asked me to format it. Panic set in because formatting meant losing everything. I searched for solutions and, after hours of trying different methods, I successfully fixed the corrupted hard drive and recovered my files without formatting.
Hard drive corruption can happen to anyone, whether you’re using an internal hard drive, an external HDD, or even an SSD. The causes range from power failures, file system errors, bad sectors, malware, or even improper removal of USB drives. The worst part? If you don’t fix it correctly, you risk permanent data loss.
But don’t worry—I’ll guide you through step-by-step solutions to repair your hard drive while keeping your files intact. Each method includes detailed instructions, explains the tools required, and highlights important warnings to prevent further damage.
Understanding the Issue
Before attempting any fix, it’s crucial to understand what might have caused the problem. Here are the most common reasons for hard drive corruption:
1. File System Errors
- Occurs when a system crashes, shuts down unexpectedly, or is forcefully powered off.
- Example: A power outage while transferring files.
2. Bad Sectors on the Drive
- Certain parts of the hard drive become unreadable, leading to data corruption.
- Example: Aging hard drives often develop bad sectors.
3. Virus or Malware Attacks
- Some viruses specifically corrupt file structures, making them inaccessible.
4. Physical Damage
- Overheating, shock from dropping, or mechanical failure can corrupt the drive.
5. Corrupt or Outdated Drivers
- If Windows cannot communicate properly with the drive, it might not recognize it.
Now that we understand the problem, let’s move on to the step-by-step solutions.
Fix 1: Check the Hard Drive Connection & Try Another Port or PC
Tools Needed:
- USB cable (for external drives)
- Another computer (optional)
Step-by-Step Instructions:
- Reconnect the Drive Properly
- If using an external hard drive, unplug it and connect it to a different USB port.
- If using an internal hard drive, turn off your PC, unplug the power cable, and check the SATA and power cables inside your computer.
- Try a Different Computer
- If the drive is still undetected, plug it into another computer to see if it’s recognized.
- Use a Different USB Cable (For External Drives)
- A damaged USB cable can prevent proper communication between the drive and the PC. Try using a different cable.
- Check Disk Management
- Press Win + X, select Disk Management.
- If the drive appears without a letter, assign one by right-clicking the drive > Change Drive Letter and Paths > Add.
Fix 2: Use CHKDSK to Scan & Repair Errors
Tools Needed:
- Command Prompt
Step-by-Step Instructions:
- Open Command Prompt as Administrator
- Press Win + R, type
cmd, and press Ctrl + Shift + Enter.
- Run CHKDSK Command
- Type the following command:
chkdsk X: /f /r /x - Replace X with the drive letter of your corrupted hard drive.
- Understand the CHKDSK Parameters:
/f– Fixes file system errors./r– Locates bad sectors and recovers readable data./x– Forces the drive to dismount before scanning.
- Wait for the Scan to Complete
- This may take time depending on your hard drive’s size.
- Restart Your Computer
- After CHKDSK completes, restart your PC and check if the drive is accessible.
⚠ Warning: If the drive has physical damage, running CHKDSK may worsen the issue. If you hear clicking noises, stop immediately!
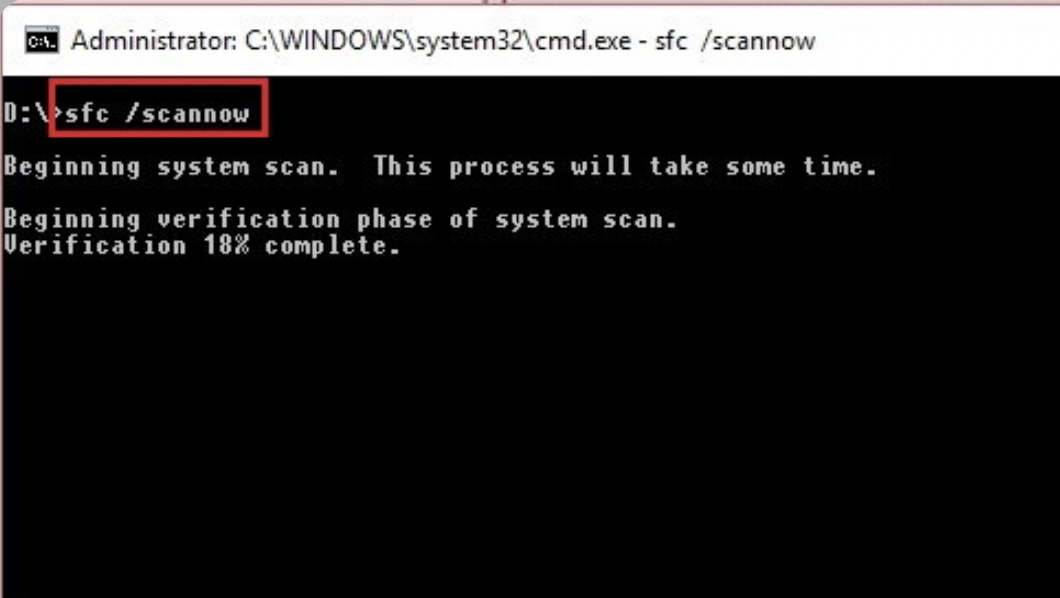
Fix 3: Run SFC & DISM to Repair Corrupt System Files
Tools Needed:
- Command Prompt
Step-by-Step Instructions:
- Open Command Prompt as Administrator
- Press Win + R, type
cmd, and press Ctrl + Shift + Enter.
- Run System File Checker (SFC) Scan
- Type:
sfc /scannow - Press Enter and wait for the process to complete.
- Run DISM to Repair Windows Image
- If SFC doesn’t fix the issue, type:
DISM /Online /Cleanup-Image /RestoreHealth - Press Enter and wait for completion.
- Restart Your PC & Check the Drive
Fix 4: Recover Data Using Windows File Recovery or Third-Party Software
Tools Needed:
- Windows File Recovery (Microsoft Tool)
- Recuva, EaseUS, or MiniTool Power Data Recovery
Step-by-Step Instructions:
Method 1: Using Windows File Recovery
- Download & Install Windows File Recovery from the Microsoft Store.
- Run It in Command Prompt
- Open Command Prompt as Administrator.
- Type:
winfr X: C:\Recovery /regular - Replace X with the corrupted drive letter.
- Replace C:\Recovery with your preferred save location.
Method 2: Using Recuva
- Download & Install Recuva.
- Launch the Software & Select the Drive.
- Scan for Lost Files and Recover Data.
Fix 5: Update or Reinstall Hard Drive Drivers
Tools Needed:
- Device Manager
Step-by-Step Instructions:
- Open Device Manager
- Press Win + X, select Device Manager.
- Expand “Disk Drives”
- Find your corrupted hard drive.
- Update the Driver
- Right-click the drive > Update Driver > Search automatically for drivers.
- Uninstall & Reinstall (If Needed)
- Right-click the drive > Uninstall device > Restart your PC.
- Windows will automatically reinstall the driver.
Pros and Cons of Each Fix
| Fix | Pros | Cons |
|---|---|---|
| Checking Connections | Quick and easy | Won’t help if the drive is physically damaged |
| CHKDSK Scan | Fixes file system errors | May worsen issues if drive is failing |
| SFC & DISM | Repairs corrupted system files | Won’t help with bad sectors |
| Data Recovery Software | Recovers lost files | Can be slow and costly |
| Updating Drivers | Fixes communication issues | Won’t work if drive is physically damaged |
Conclusion
A corrupted hard drive doesn’t always mean data loss. By following these detailed step-by-step fixes, you can recover lost files and restore your hard drive without formatting it.
⚠ Important: Always back up your files to avoid future data loss.
Did these methods work for you? Share your experience or ask questions in the comments!