
Yesterday, my Lenovo laptop suddenly started making a loud whirring noise, and after a few minutes, it became too hot to touch.
At first, I ignored it, thinking it was normal wear and tear. However, the problem got worse—performance slowed down, and the laptop started shutting down unexpectedly.
After troubleshooting, I found that dust buildup and dried thermal paste were the main culprits. By carefully cleaning the fan and reapplying thermal paste, I was able to restore my laptop’s cooling efficiency and silence the noisy fan.
Laptop fans are essential for keeping the system cool, but over time, they can become clogged with dust, causing them to work harder and produce excessive noise. Overheating can lead to performance issues, automatic shutdowns, and long-term hardware damage.
In this guide, I’ll show you step-by-step how to fix a noisy laptop fan and overheating problems. You’ll learn how to clean the fan properly, replace the thermal paste, and adjust system settings to prevent future overheating.
Before we begin, make sure you have the necessary tools and follow each step carefully to avoid damaging your laptop.
Understanding the Issue
A noisy fan and overheating can be caused by several factors, including:
- Dust buildup: Dust accumulates in the cooling vents and fan, restricting airflow.
- Worn-out thermal paste: The thermal paste between the CPU and heatsink dries out over time, reducing heat transfer.
- Malfunctioning fan: A damaged or faulty fan may spin erratically or too fast, causing excessive noise.
- High CPU/GPU usage: Running heavy applications for prolonged periods forces the fan to work harder.
- Blocked air vents: Placing the laptop on soft surfaces like a bed or couch blocks airflow, causing heat buildup.
Now, let’s go through the fixes step by step.
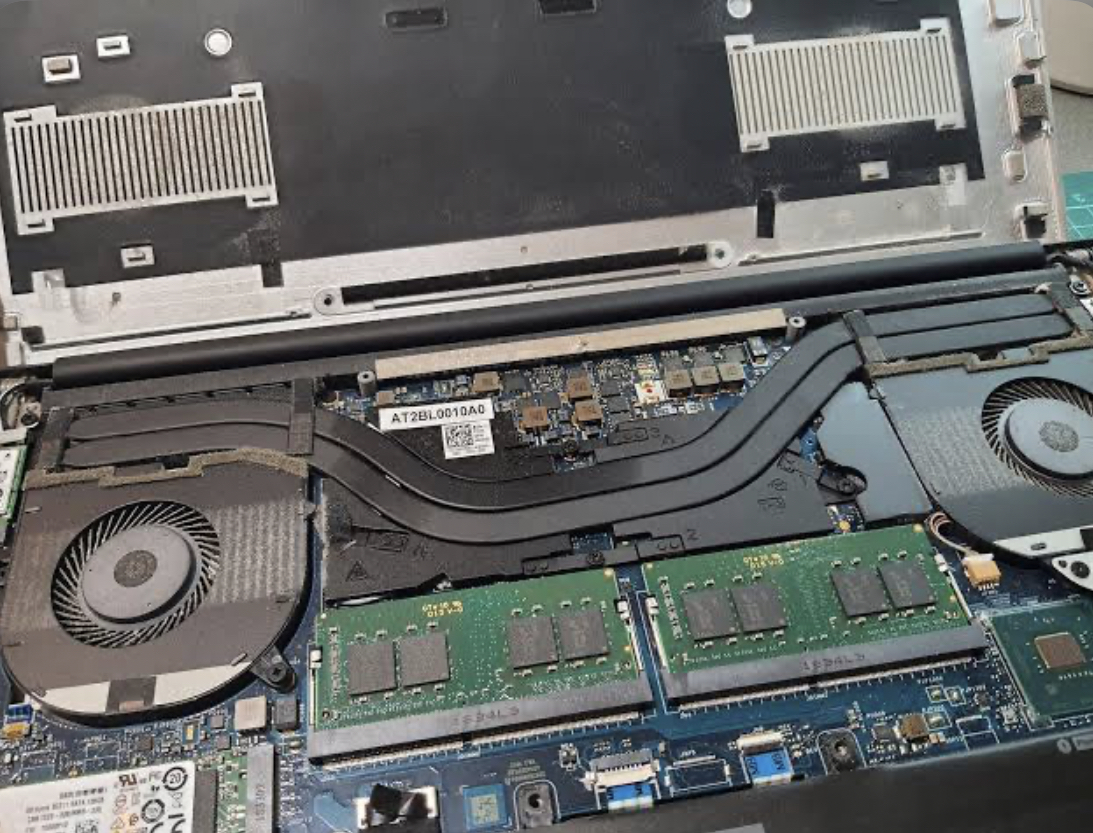
Fix 1: Cleaning the Laptop Fan and Vents
Tools Needed:
- Small Phillips screwdriver
- Soft brush (anti-static recommended)
- Compressed air can
- Isopropyl alcohol (90% or higher)
- Microfiber cloth
Step-by-Step Instructions:
- Turn off the laptop and unplug the charger.
- Press and hold the power button for 5 seconds to discharge residual power.
- Remove the battery (if removable).
- Slide the battery release latch and gently lift the battery out.
- Unscrew the back panel to access the fan.
- Use a small Phillips screwdriver to loosen the screws securing the back panel.
- Keep the screws in a safe place to avoid losing them.
- Carefully remove the back panel.
- Use a plastic pry tool or your fingernail to lift the panel without scratching the laptop.
- Locate the fan and cooling vents.
- Identify the circular fan and the metal heatsink connected to it.
- Use a brush to remove visible dust.
- Gently brush the dust off the fan blades, heatsink, and vents.
- Use compressed air to clear deep dust buildup.
- Hold the fan blades still with your finger to prevent spinning.
- Spray short bursts of air into the fan and vents from different angles.
- Wipe the surrounding area with isopropyl alcohol.
- Use a microfiber cloth lightly dampened with isopropyl alcohol to clean any remaining grime.
- Reassemble the laptop.
- Reattach the back panel, tighten the screws, and insert the battery.
- Power on the laptop and check if the noise has reduced.
Warning: Never use a vacuum cleaner, as it can generate static electricity and damage internal components.
Fix 2: Reapplying Thermal Paste
Tools Needed:
- Thermal paste (Arctic MX-4 or similar)
- Small Phillips screwdriver
- Isopropyl alcohol (90% or higher)
- Microfiber cloth
Step-by-Step Instructions:
- Follow steps 1–4 from Fix 1 to open the laptop.
- Locate the heatsink and CPU/GPU.
- The heatsink is a metal plate covering the processor.
- Unscrew the heatsink carefully.
- Loosen all screws in a crisscross pattern to prevent damage.
- Gently lift the heatsink off.
- If it’s stuck, wiggle it slightly—don’t force it.
- Clean off the old thermal paste.
- Dampen a microfiber cloth with isopropyl alcohol and wipe the old paste off both the CPU and heatsink.
- Apply a small dot of new thermal paste.
- Place a pea-sized drop of paste at the center of the CPU.
- Reattach the heatsink.
- Gently lower the heatsink back in place.
- Tighten the screws evenly in a crisscross pattern.
- Reassemble the laptop and power it on.
Best Practice: Apply only a small amount of paste—too much can reduce heat dissipation.
Fix 3: Adjusting Power Settings to Reduce Fan Speed
Steps:
- Open Windows Power Options.
- Press
Windows + Xand select Power Options.
- Select a power plan that reduces CPU usage.
- Choose Balanced or Power Saver mode.
- Modify advanced settings.
- Click Change Plan Settings > Change Advanced Power Settings.
- Expand Processor Power Management and reduce Maximum Processor State to 80%.
- Apply changes and restart your laptop.
This prevents unnecessary overheating by reducing CPU workload.
Pros and Cons of Each Fix
| Fix | Pros | Cons |
|---|---|---|
| Cleaning the fan and vents | Easy and cost-effective | Requires opening the laptop |
| Reapplying thermal paste | Improves cooling efficiency | Slightly technical |
| Adjusting power settings | Reduces overheating without opening the laptop | May lower performance |
Conclusion
A noisy fan and overheating laptop can lead to severe performance issues and hardware damage if left unchecked. By regularly cleaning the cooling system, reapplying thermal paste, and optimizing power settings, you can keep your laptop running smoothly and quietly.
If you’ve tried these fixes and your laptop is still overheating, the fan itself may be damaged and require replacement.
Have you experienced laptop overheating before? Let us know your thoughts or any questions in the comments below!